You are using an out of date browser. It may not display this or other websites correctly.
You should upgrade or use an alternative browser.
You should upgrade or use an alternative browser.
Resin for carbon tuned pipe?
- Thread starter jaxracer
- Start date


Help Support Intlwaters:
This site may earn a commission from merchant affiliate
links, including eBay, Amazon, and others.
dwilfong
Well-Known Member
- Joined
- Jul 1, 2008
- Messages
- 5,968
What resin you using and what Temp to cure?David,
That is how I am doing some small pipes.
The wax is easy to use and works great.
Thanks,
Mark Sholund
What about a ceramic coating sprayed on the wax first?
- Joined
- Dec 5, 2003
- Messages
- 193
Carl,Mike,
You have a nice looking pipe. I have played with carbon pipes for a couple of years now and people don't realize how time consuming they are to manufacture. Your method is quite different from mine and mainly because your making individual tubular sections. I too have vacuum bagged using the two sheets method and sanding the residual material crease that the bags leave can get tiring if you make many of them. I have used some of Cotronics products in the past.
Does your 4461 epoxy have an initial ambient temperature cure prior to your post cure?
Your work is very nice. Thanks for sharing.
-Carl
Yes the Cotronics 4461 epoxy does have an ambient temperature first. It is considered a room temperature cure epoxy. I vacuum bag the parts for 8 hrs. and then remove from the bag. The epoxy is solid but a little tacky to the touch still. I then let the parts air temp cure for another 12 hours - the mold plug is still in the pipe sections. After that the surface is not tacky feeling. I then demold from the plugs. I press the plug out of the part. This was key piece in figuring out how to make the pipe sections. Once the plugs are remove I was out the PVA mold release, dry, and then put in the oven for 4 hrs at 250 deg. Once the parts are removed they then have solidified and the sections have "ping" to them. I can then trim to the final dimensions for each section. I definitely think the oven cure step after the initial room temp. curing is required for the best results.
The pipe plug sections are made from 3D printed PLA material. They are finished and painted to make a smooth surface. Since they are PLA plastic, I could not not do an oven cure of the part and mold. The 3D printed pipe section molds were also an inexpensive way to go. The use of the PLA printed plugs are also why I went with a room temp cured high temp epoxy.
Buckshot,
I am doing a wet layup. I have not ventured into vacuum infusion yet. For the tuned pipes with the Cotronics epoxy, I do not think it would infuse real well. It is not a true laminating resin so flows a little "different".
Let me know if you have any questions.
Mike
- Joined
- Jul 24, 2002
- Messages
- 7,126

Looks like 3 layers per section? What weight braid are you using?
Is the O ring to hold the layers in place while you wet them out?
Again, nice work!
ian thompson
Well-Known Member
- Joined
- May 2, 2014
- Messages
- 92
Has anyone tried the cotronics 4460 resin? It is rated to 600F but has to be cured at 250 F ..no ambient temp cure.
LohringMiller
Well-Known Member
- Joined
- Jan 25, 2017
- Messages
- 872
I tried to make carbon pipes for gas engines. I used machined aluminum for part of the header and stinger sections. Even so the temperature was too high and the inner layer was dislodged and plugged the stinger. Brian Buaas has made some winning carbon pipes for nitro engines. He machines his inner molds, but otherwise used similar methods.
Your pipes are among the best I've seen. Outboard pipes would be a great addition using 3D printed curved inner sections. If they were printed in PVA you could dissolve it out with water.
Lohring Miller
Your pipes are among the best I've seen. Outboard pipes would be a great addition using 3D printed curved inner sections. If they were printed in PVA you could dissolve it out with water.
Lohring Miller
- Joined
- Dec 5, 2003
- Messages
- 193
Terry,View attachment 288394
Looks like 3 layers per section? What weight braid are you using?
Is the O ring to hold the layers in place while you wet them out?
Again, nice work!
This is an older picture - but it does show the general materials. I am using three layers of braided carbon sleeve. The sleeve material is from Soller Composites. It is their 3K type. The sleeves come in different sizes and can expand/contact some. There is a limit though. For the tail cone section I have to use two different sizes braids and then stagger the overlaps some to try and make the outside look "smooth". For the other pieces I can use just one size braid. When laying up, I am not using anything to hold the layers in place. There is a enough "stickiness" with the epoxy to hold in place. I apply a thin layer of epoxy to the mold surface, add a layer of carbon, wet out with additional epoxy, add another later, repeat for a total of three carbon layers. I then use Airtech's Econolease vacuum bag peal ply, breather material, and place in vacuum bag.
For the picture, I was still experimenting with different methods of removal of the finished pipe section from the mold. O-ring did not work well. What works best for me is to use a piece of neoprene rubber (1/8th" thick x 3/4" wide) wrapped around the mold circumference with double faced tape. This is on one end of the mold only. The rubber's thickness forms another flange section on the carbon pipe part when done. When the pipe part is ready to be removed from the mold, I use a Dremel cutoff wheel to cut through the carbon layers and into the rubber part. The rubber piece is a sacrificial one. It gets grooved but not cut all the way - the idea is to save the 3D mold part from getting cut so it can be reused. By cutting through the carbon, it allows the rough ends of the layup to be removed and creates a "smoother" surface that is used to press the mold plug out. Before pressing out the mold from the part, the rubber piece is pulled off the mold. I did not have a photo of this unfortunately.
Attached is a photo of a pipe section with the neoprene rubber piece added. The step in the mold is what is used to create the glue flange for attaching the pipe section together. The rubber piece creates another step used for pressing the mold out of the plug. The other attached photo shows the part used to press out the carbon pipe piece - if that makes sense. When the pipe sections are laid up, the length of carbon does not extend the full length of the mold on the header end, stinger end, or barrel. This way there is a surface of the mold to press against. The flange end goes against the wood piece and then press out the mold using a large C-clamp. The 3D printed mold is a little more solid on the header and stinger ends.
Hope that makes sense.
Mike
Attachments


- Joined
- Mar 6, 2011
- Messages
- 1,356
I have tried printing with the PVA but did not like it. Seems like it absorbs moisture from the air and maybe I should have made a little drying cabinet but put it aside and moved on to the next project. I have an entire roll of it so I am sure I will go back to it soon.
- Joined
- Dec 5, 2003
- Messages
- 193
I do not have a 3D printer but source the parts from a print service - so don't know about the moisture part. Once I get the parts, I coat them in an epoxy microballons mixture to fill the grooves between print layers. Sand smooth, add primer layer, and polish smooth.I have tried printing with the PVA but did not like it. Seems like it absorbs moisture from the air and maybe I should have made a little drying cabinet but put it aside and moved on to the next project. I have an entire roll of it so I am sure I will go back to it soon.
Mike
- Joined
- Mar 6, 2011
- Messages
- 1,356
Yes, I found that coating as you have done or spray painting & lightly sanding the printed parts that are used for molds makes everything work much better.
- Joined
- Oct 25, 2015
- Messages
- 1,651
As Mike mentioned above, Cotronics Corp. produces some very good hi temp resins that often exceed there ratings.
A friend of mine that winds very hi performance slot care armatures encapsulates the windings, in a vacuum chamber
subjected to UV rays, with excellent results. I'd have to contact him as to what temperatures the Open Class Gp 7
armatures can encounter.
Have a look:
http://www.cotronics.com/vo/cotr/ea_ultratemp.htm
Tim
- Joined
- Oct 25, 2004
- Messages
- 1,130
Yes, pva is highly hygroscopic, you should invest in a filament dryer. Leave the spool in the dryer while printing.I have tried printing with the PVA but did not like it. Seems like it absorbs moisture from the air and maybe I should have made a little drying cabinet but put it aside and moved on to the next project. I have an entire roll of it so I am sure I will go back to it soon.
This applies to multiple other filaments as well, such as nylon.
Pay attention when drying filament as too high temp will completely ruin your filament.
https://de.printdry.com/
LohringMiller
Well-Known Member
- Joined
- Jan 25, 2017
- Messages
- 872
When I print nylon, I always dry the filament in the kitchen oven at it's lowest temperature. I don't know if this is low enough for PVA. If you really want to spend money there is Ionic support filament. I can't see how it would be better for this application unless you were 3D printing pipes. But wait, could you?
Lohring Miller
Lohring Miller
- Joined
- Apr 27, 2007
- Messages
- 3,369
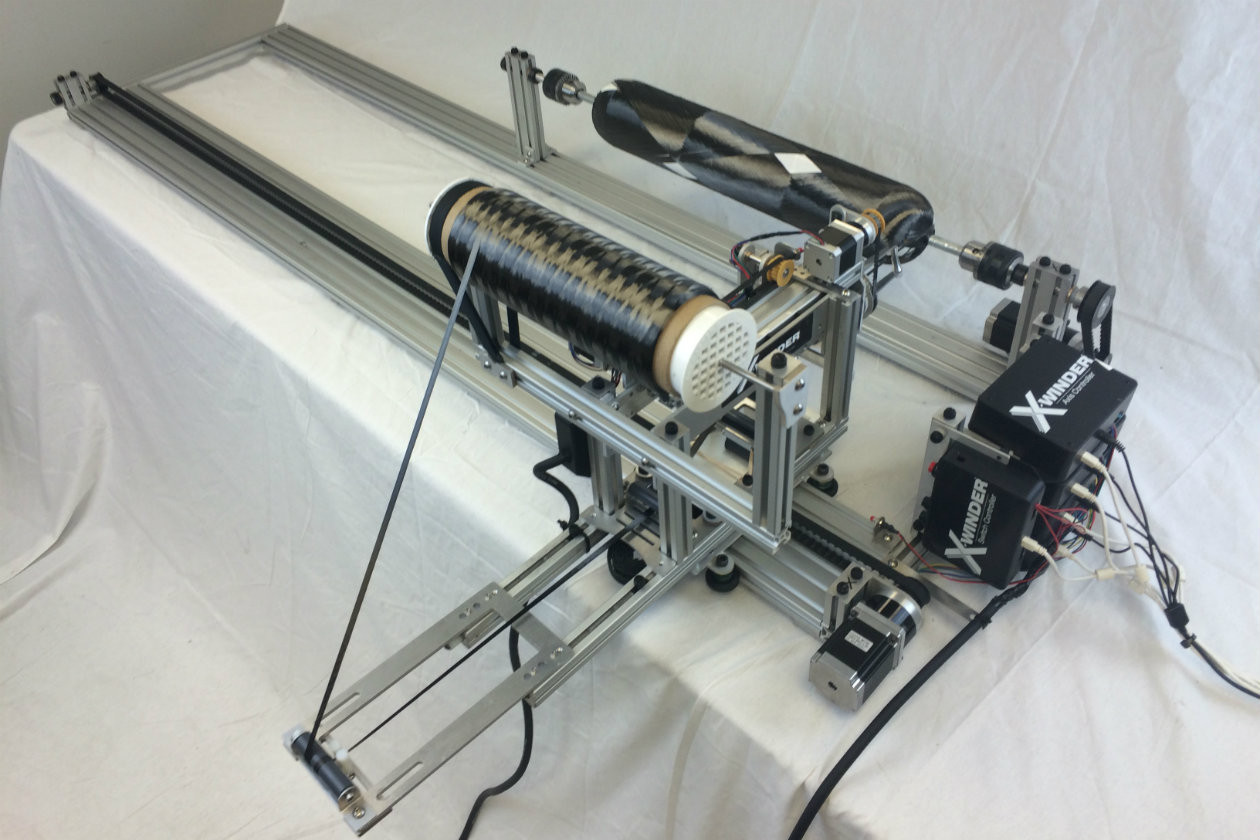
Anyone thought about using a desktop size filament winder with some wax cores? X Winder has a nice DIY kit you can program.
X Winder
I have one of these at work for some projects and thought it would be cool to wind pipes on a meltable wax core with appropriate aluminum or steel rod to support the wax while the carbon is tensioned. Can't mix work and hobbies too much, but maybe Terry or Buck will get inspired.
X Winder
I have one of these at work for some projects and thought it would be cool to wind pipes on a meltable wax core with appropriate aluminum or steel rod to support the wax while the carbon is tensioned. Can't mix work and hobbies too much, but maybe Terry or Buck will get inspired.
Brandon Atwell
Well-Known Member
- Joined
- Mar 11, 2012
- Messages
- 1,203
Still tossing the idea around, think we might have a process that would work. Starting to work on some potential test setups.
The 4460 looks like the best bet but really not a fan of it only withstanding 600 degrees. Think an aluminum sleeve at the inlet would help solve some potential overheating issues. I noticed on our infrared heat gun alone a 40 degree difference in temperature from the inlet to belly of a pipe on a .45 engine. can only imagine the range difference inside of the pipe.
The 4460 looks like the best bet but really not a fan of it only withstanding 600 degrees. Think an aluminum sleeve at the inlet would help solve some potential overheating issues. I noticed on our infrared heat gun alone a 40 degree difference in temperature from the inlet to belly of a pipe on a .45 engine. can only imagine the range difference inside of the pipe.
dwilfong
Well-Known Member
- Joined
- Jul 1, 2008
- Messages
- 5,968
I am going to use wax to build mine with a piece of pipe in the front chucked up in the lath and a piece in the back in the live center.Anyone thought about using a desktop size filament winder with some wax cores? X Winder has a nice DIY kit you can program.
X Winder
I have one of these at work for some projects and thought it would be cool to wind pipes on a meltable wax core with appropriate aluminum or steel rod to support the wax while the carbon is tensioned. Can't mix work and hobbies too much, but maybe Terry or Buck will get inspired.
The center will be the wax that will melt out when it cures.
This way I can spin the pipe as I wrap it with 1" CF tape.
- Joined
- Jul 24, 2002
- Messages
- 7,126
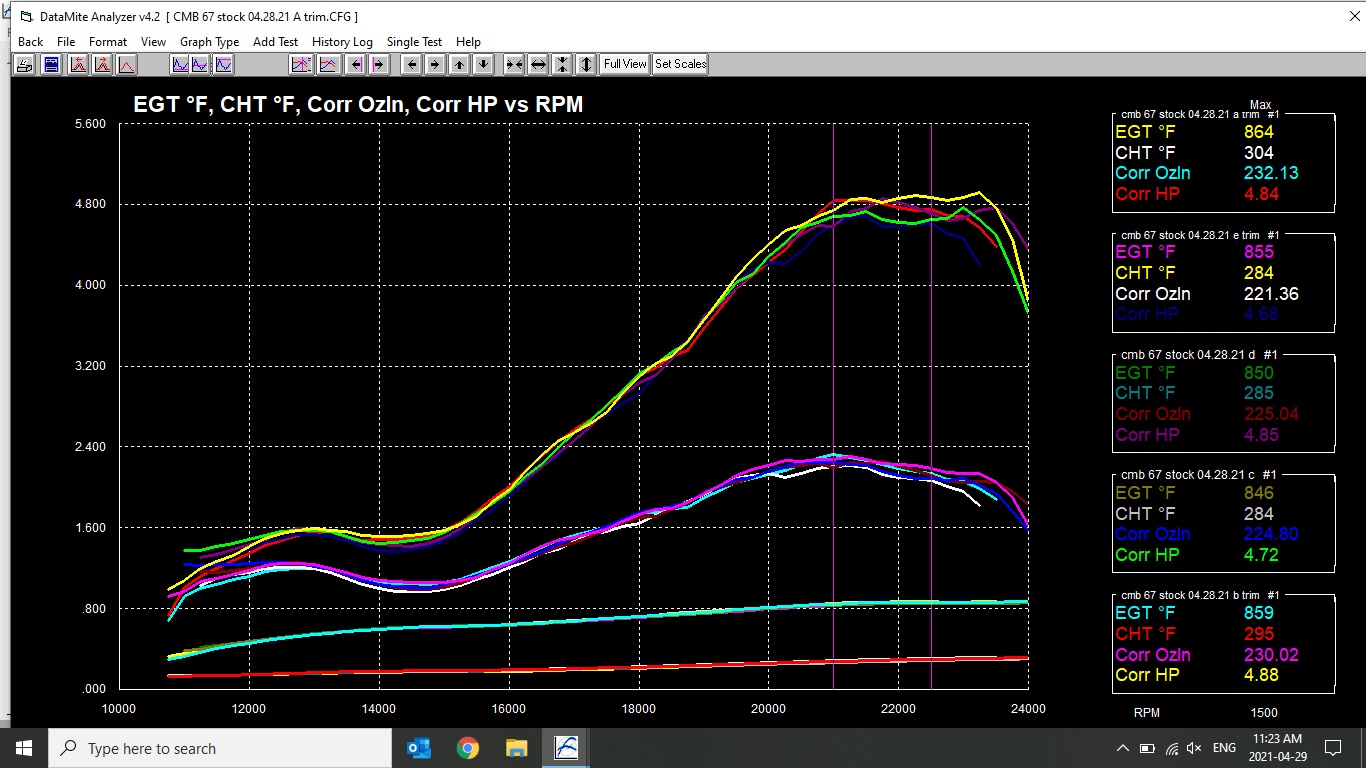
Getting close to 900F on the dyno, haven't quite seen that yet in the boat but getting close. And that's 3" from the piston...
Similar threads
- Replies
- 73
- Views
- 7K
- Replies
- 59
- Views
- 7K
- Replies
- 28
- Views
- 5K