


Mike McKnight
Well-Known Member
- Joined
- Sep 1, 2005
- Messages
- 1,550
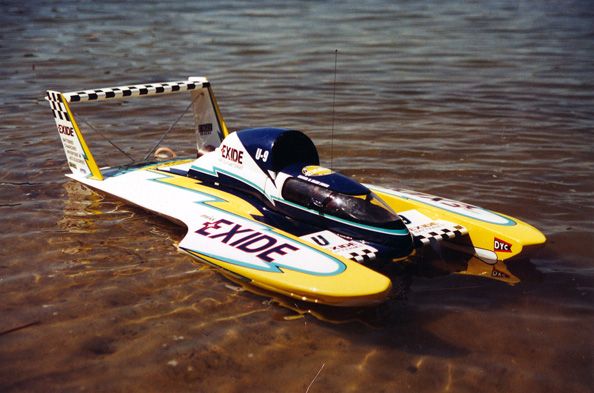
Well my old Exide boat has been sitting on the shelf for a very long time. Here's what she looked like the last year I ran her which was about 7 years ago.
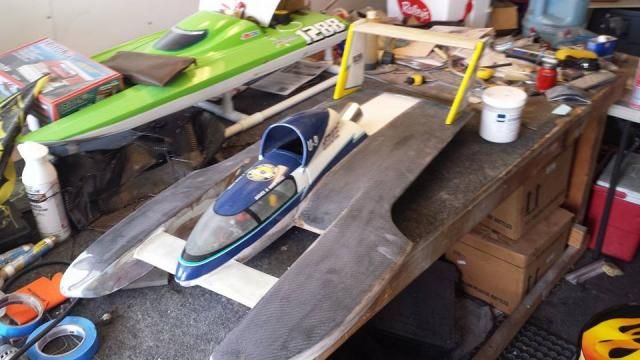
She has kind of storied past going back and forth from California to Washington. She originally started as McIntire Winston/Joe's hull and I think the original builder was a guy named Jim Rogers in 1998? Maybe RCU guys can help me out on that one. In any case my friend Troy Davis bought and brought it here and ran it pretty successfully before he built a Smokin' Joe's. He sold it to Bill Brandt in the early 2000's and he ran it once and it blew over and a vert was lost. I bought it 2004ish and brought it back down here. Troy helped me build a new wing mold and we made a new set of verts for it and it had a partial repaint. I won my first scale race with it and ran it for two years until I had an accident where my throttle servo horn broke and I hit the retaining wall coming into the pits and split the left sponson open at the seam. Oddly enough I taped it back together and went out for the last heat and set a district fast time. I joked about leaving her that way. Well she went on the shelf because I had already built my 89 Circus. She's been sitting there all this time waiting for some love. I pulled it down about 3 months ago and have been slowly stripping it ever since. I wish I had taken more pics of everything I did to her but I'll describe as best I can.
First the sponson repair. After I had it stripped I cut a large rectangular section out of the sponson deck so I could have access to the back of the seam. After I clamped everything back in place I tacked the seam together and then glassed it back in place from the leading edge of the bull nose on the left side to the tip of the sponson and around the outside edge about half way down. One all of that was in place I made a lip with thin sheeted glass around the bottom of the rectangle I had cut in the deck. I then tacked the piece I had cut out back into place. I then filled the seam of the rectangle. After than I sanded flush and continued with the stripping of paint. By the way I should add that this boat had two full paint jobs on it!! I was stunned but it explained why it was heavy. After stripping I overlaid the decks with 5.7 carbon twill. After that cured I trimmed and sanded it down and blended in to the original decks.
Several people have asked my why I do this. It adds an incredible amount of strength to decks that were kind of thin and very flexible without adding very much weight at all. It also takes a lot of flex out of the boat since there wasn't any carbon in the layup.
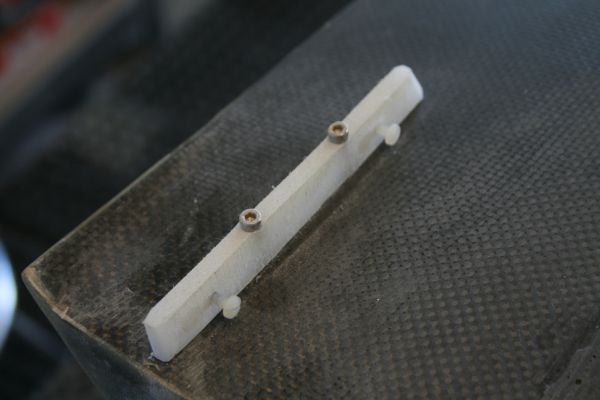
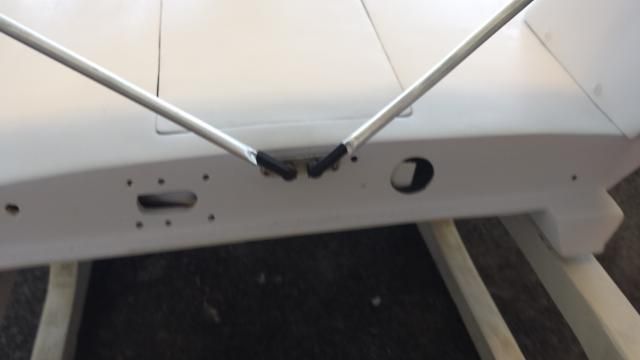
The next operation was to beef up the wing mounts. The original ones were wood that attached at the bottom of the boat and extended through the deck with a blind nut in the backside to bolt to. As you can imagine the blind nut set up eventually rotted out and they verts weren't very secure. So out came the Dremel and all of wood came out as well as a TON of gobbed in resin I found in the back corners of the boat.After all that was out I installed the under the deck parts of my wings mounts. On the decks are the UHMW blocks that are sanded to match the base of the verts. The verts attach with 4-40 nylon screws.
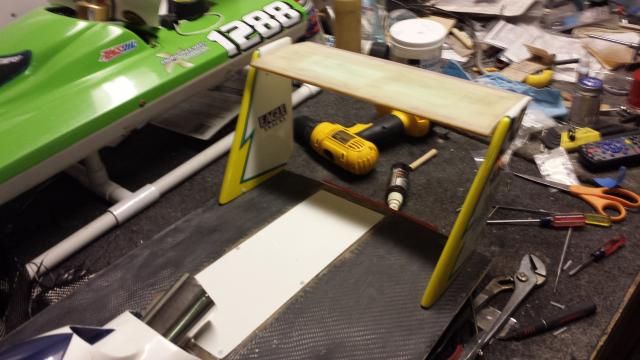
Next operation was to built a new wing. The old one was so incredibly thick and heavy I can't imagine how the boat even ran. I replaced it with some wing halves from RC Boat Co. The new wing is less than half the thickness and about 1/3 the weight.
I also replaced the gathering plate for the struts. The ball studs screw into a small aluminum plate that itself it bolted into the transom.
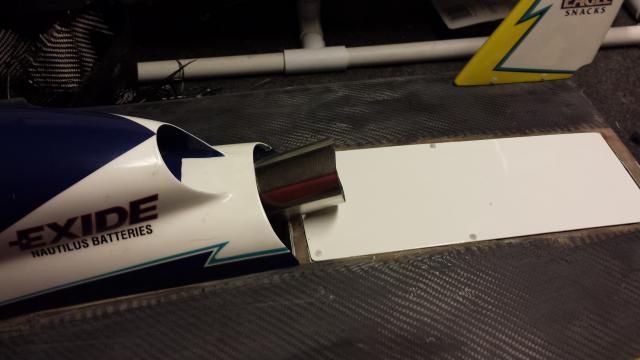
Next a little cosmetics. I replaced the turbine exhaust. The original was not secured in very well. I took out the wood backing and replaced it with sheeted CF. The new stainless hot section bolts in.
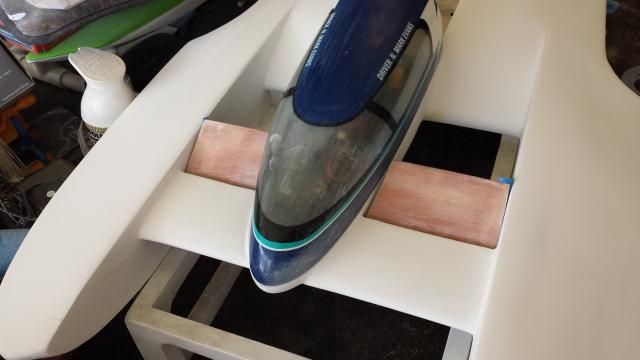
As I started pulling old parts out of the box I found other things that needed replacing. The old canard flaps were incredibly heavy and need to be replaced. I tacked together two 3" airfoil halves then channeled the leading edge for brass tubing. I cut them down by 1/4" and sanded to shape and filled with resin and micro balloons and glassed over the entire flap. The flaps weigh 1/3 of the originals.
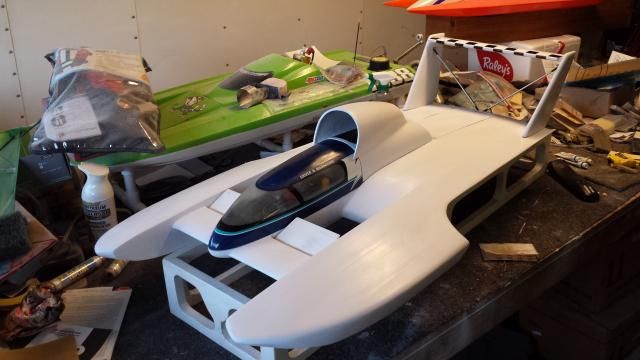
So my original plan was to not have to repaint the ENTIRE boat since I have the original paint codes. But as I got further into it I decided to strip the cowl and verts. The cowl had some small stress cracks and the verts had some chips so I said to heck with it and took em all the way down. The canopy is the only thing that hasn't had to be stripped. So after 2 primer coats...one to fill that was mostly sanded off and the other for base coat...here she sits with all white.
I've already wet sanded and the color will start tomorrow hopefully. I was originally going to take this to a guy near my office that paints hot rods but I have decided to tackle the job myself. In case you are wondering about all the weight she lost, Between paint and all the grinding and parts replacement I am estimating she will end up close to 1.25 to 1.5 lbs lighter than she was. Fully rigged she used to weigh in at 16.75 lbs. The good news it still balances very well. We'll see what happens when I start adding hardware.
More to come.....

She has kind of storied past going back and forth from California to Washington. She originally started as McIntire Winston/Joe's hull and I think the original builder was a guy named Jim Rogers in 1998? Maybe RCU guys can help me out on that one. In any case my friend Troy Davis bought and brought it here and ran it pretty successfully before he built a Smokin' Joe's. He sold it to Bill Brandt in the early 2000's and he ran it once and it blew over and a vert was lost. I bought it 2004ish and brought it back down here. Troy helped me build a new wing mold and we made a new set of verts for it and it had a partial repaint. I won my first scale race with it and ran it for two years until I had an accident where my throttle servo horn broke and I hit the retaining wall coming into the pits and split the left sponson open at the seam. Oddly enough I taped it back together and went out for the last heat and set a district fast time. I joked about leaving her that way. Well she went on the shelf because I had already built my 89 Circus. She's been sitting there all this time waiting for some love. I pulled it down about 3 months ago and have been slowly stripping it ever since. I wish I had taken more pics of everything I did to her but I'll describe as best I can.
First the sponson repair. After I had it stripped I cut a large rectangular section out of the sponson deck so I could have access to the back of the seam. After I clamped everything back in place I tacked the seam together and then glassed it back in place from the leading edge of the bull nose on the left side to the tip of the sponson and around the outside edge about half way down. One all of that was in place I made a lip with thin sheeted glass around the bottom of the rectangle I had cut in the deck. I then tacked the piece I had cut out back into place. I then filled the seam of the rectangle. After than I sanded flush and continued with the stripping of paint. By the way I should add that this boat had two full paint jobs on it!! I was stunned but it explained why it was heavy. After stripping I overlaid the decks with 5.7 carbon twill. After that cured I trimmed and sanded it down and blended in to the original decks.

Several people have asked my why I do this. It adds an incredible amount of strength to decks that were kind of thin and very flexible without adding very much weight at all. It also takes a lot of flex out of the boat since there wasn't any carbon in the layup.
The next operation was to beef up the wing mounts. The original ones were wood that attached at the bottom of the boat and extended through the deck with a blind nut in the backside to bolt to. As you can imagine the blind nut set up eventually rotted out and they verts weren't very secure. So out came the Dremel and all of wood came out as well as a TON of gobbed in resin I found in the back corners of the boat.After all that was out I installed the under the deck parts of my wings mounts. On the decks are the UHMW blocks that are sanded to match the base of the verts. The verts attach with 4-40 nylon screws.

Next operation was to built a new wing. The old one was so incredibly thick and heavy I can't imagine how the boat even ran. I replaced it with some wing halves from RC Boat Co. The new wing is less than half the thickness and about 1/3 the weight.

I also replaced the gathering plate for the struts. The ball studs screw into a small aluminum plate that itself it bolted into the transom.

Next a little cosmetics. I replaced the turbine exhaust. The original was not secured in very well. I took out the wood backing and replaced it with sheeted CF. The new stainless hot section bolts in.

As I started pulling old parts out of the box I found other things that needed replacing. The old canard flaps were incredibly heavy and need to be replaced. I tacked together two 3" airfoil halves then channeled the leading edge for brass tubing. I cut them down by 1/4" and sanded to shape and filled with resin and micro balloons and glassed over the entire flap. The flaps weigh 1/3 of the originals.

So my original plan was to not have to repaint the ENTIRE boat since I have the original paint codes. But as I got further into it I decided to strip the cowl and verts. The cowl had some small stress cracks and the verts had some chips so I said to heck with it and took em all the way down. The canopy is the only thing that hasn't had to be stripped. So after 2 primer coats...one to fill that was mostly sanded off and the other for base coat...here she sits with all white.

I've already wet sanded and the color will start tomorrow hopefully. I was originally going to take this to a guy near my office that paints hot rods but I have decided to tackle the job myself. In case you are wondering about all the weight she lost, Between paint and all the grinding and parts replacement I am estimating she will end up close to 1.25 to 1.5 lbs lighter than she was. Fully rigged she used to weigh in at 16.75 lbs. The good news it still balances very well. We'll see what happens when I start adding hardware.
More to come.....


