My first build Day 1

Intlwaters

Help Support Intlwaters:

This site may earn a commission from merchant affiliate links, including eBay, Amazon, and others.

mike_savoie

Active Member
Joined
Jan 12, 2006
Messages
29
First things first.

Thanks for the welcome everyone!

So I thought I'd document step by step the building of my boat. Hopefully, you guys will notice something I may be doing wrong, or a better way of doing something and can point me in the right direction. And also it could help someone just starting out or starting this same boat by showing how it shoud/ shouldn't be done or things to watch for.

I just heard of a great deal on a 79pc dremel for 20 bucks, so I'm gonna run to pick one up...so I'll have to do the uploading and more posting when I get home.
 
Well I'm having a little trouble with the digi camera, so I'll have to edit the posts to get the pics in.

First impressions, the box was much smaller than I was expecting. Once I got the box open I realized this hobby is going to be interesting...it was a bunch of pieces of plywood. I started pulling pieces out and inspecting them, lots of hmms, and uhhhs, wonder what this is for...

Then I grabbed the destructions, cracked open a cold one sat back for some reading. I read and re-read them. I needed some building material so I would have to head to the hardware store in the morning. Here's what I picked up.

- 24"x24"x1/2" scrap plywood - $3

- small hammer - $1

- package of sandpaper - $1

- ruler - $1

- Hanger 9, 30min epoxy - $14

- small tool box - $6

- assorted clamps - $6

- and later last night my buddy told me about a sale on rotary tools so I picked up 77pc kit for $19.99

So armed with some knowledge and building material I got started.

I marked all the parts, and drew a centerline on all the frames before punching them out of their plywood homes removing splinters with 80 grit sandpaper. It should be noted that I didn't worry about doing a great job sanding, I figured I would be best to wait and check to see how everything fit and could sand better at that time.

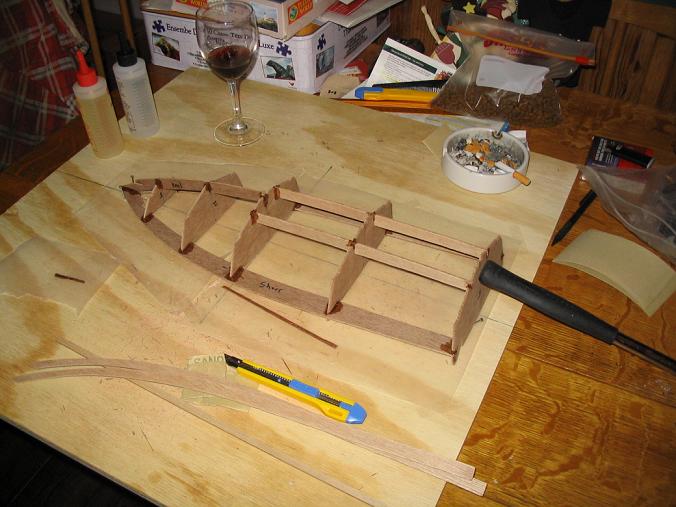
Then I folowed the instructions for marking the board, draw a centerline across the board, and 11" up from one end draw another line perpendicular to the centerline. It was suggested to cover the work area with wax paper ( saves from glueing the boat to the board...that would suck ).

So now start putting it together. First step was to lineup the 2 sheers having the points meet on the centerline, and put the 3rd frame in place using the second line as a guide. Once it's all lined up, the sheers are nailed to the board, and then once the frame is all squared up epoxy it in place.

To apply epoxy, I use a small piece of wax paper. Add the amount of resin and hardener I think I'll need. And I used some small pieces of scrap to mix and apply it. I would have tried using the bottoms of 2l bottles for the epoxy, but unfortunately here on PEI all we get are 1l glass bottles. haha it's a funny place like that.

132_3292.JPG


132_3294.JPG


This is what I have now. I let it dry for about an hour. I'm not sure if I have enough epoxy on the joints, I guess I can always add more later right?
 
Last edited by a moderator:
Excellent! Thanks for taking time with this, it'll help for sure. :)

I never had luck adding pictures to posts either, might be easier to start a photo gallery. Just go to the link below and I think if you follow the instructions you can start one to post your pictures to, then you can just include a link to what you're talking about.

https://www.intlwaters.com/gallery/

Check out some other member's stuff while you're there, you might like what you see... :D

ps: Those little Dixie bathroom cups work great with popsicle sticks for mixing epoxy, both at the grocery store. Be sure you get the proprtions right!
 
Last edited by a moderator:
Mike,You could probably go to a fast food place,they have those little paper or plastic cups for ketchup! What program did You use to shrink your photos?

 
Last edited by a moderator:
Mike

Looks like fun, brings back memories of my first projects.

Here are a few things that I didn't know when I started that might help.

You asked about curing time of epoxy, epoxy curing rate depends on temperature. Mix it on something cold to extend you working time. Warm up your project to speed up curing time.

You can use alcohol (isopropyl) not Whisky to clean up epoxy.

Adding a little silica to your epoxy will keep it in place.

After some time passes the pictures you post will get deleted to conserve space, if you upload them to the photo gallery they will always be available.

MikeP
 
A little shortcut to the gluing process is to use a medium CA+ to tack the joints and the "kicker" CA acceleator to instantly freeze into place. That way you don't have to worry about the wood moving while the glue is drying.

You can apply epoxy to the joint for more strengh. then move to the next joint while the epoxy dries.

CA is used on most outriggers nowadays to increase the speed of building and is time tested.

Don't over apply the CA kicker or you'll weaken the CA joint and make it too brittle. Just a light mist will do.

For joints, if you don't use the kicker you'll have about 10 seconds to position the piece before the glue sets.

If you glueing large flat sheets together, the CA will set much faster.

I learned the hard way with a Miss Thriftway. I put a .15 airplane engine with octura cool clamp and dumas marine engine conversion kit on the motor (OLD days).

Well the boat was put together with .....HOT glue..... :) talk about a disaster. Every run a piece was coming off.
 
Last edited by a moderator:
Talk about some fast replies! This forum is great.

I'll have to try some different methods for mixing. I keep accidentaly laying my arm on the wax paper...I'll try to find some CA tomorrow when the stores open again. Sounds like just the thing I need. A little trick I used last night was twist ties, you always get a crapload with garbage bags, and they hold very well. I've uploaded a bunch of pics to my galery so I'll be able to show how I used em.

For resizing pictures, I open them one at a time with Microsoft Paint. Then go to image/ stretch/ skew. The originals were 1600x1200 I think, then under the stretch boxes, just type 65 in both hor & ver % boxes, then reduced to 65%x65% again to get the size I posted on here. Doing it that way doesn't seem to lose any quality to the picture, but just shrinking them I doubt would drop much quality anyway.
 
The initial setup is dry. So I move on to the next steps which include attaching the remaining 5 frames, keel, and stringers.

I had a little trouble getting the 4th frame in place. The directions said the framing should easily 'stretch' to allow it to slide in place, but I found it was much easier to pull one sheer up and pop it in on an angle.

132_3296.JPG


Once that dried it was time for the chines. I couldn't find a suitable place to use the clamps to hold the chines in place and I don't have any straight pins so I decided to try using twist ties. Here you can see how the clamp is pulling on the stringer. But it also shows how the ties were used.

133_3309.JPG


The keel battens were added before I went to bed and I haven't gotten pictures of that yet. They were pretty straight forward, with a little trimming the popped in place. Then I needed to do some trimming, made easy using the saw blade attachment I got with the rotary tool...I love that thing.

So the next step will be adding the bottoms. This is where I'll definately be needing a lot of sanding. Everything needs to match the frames as the bottoms need to sit flush on everything possible. I'm a little nervous and hesitant with this part. Any suggestions for things to watch out for here?
 
I was in the same boat you were in a few weeks ago, I just started my first wood mono and it happens to be a Dumas Ske Vee-10, pretty similar boats but it looks like yours has way more framing built up. As long as your frame work is even and true the bottom halves should hit just about every part it needs to. I didn't have any trouble w/ the bottoms but the sides for mine are quite perplexing, lots of trimming I found out has to be done. I still havn't put the sides on because I need to get a dremel and some good attachments. I couldn't figure out a very good way to keep the bottoms clamped down on the frame so I got some scrap metal parts from work and laid them on top of the bottoms over the pieces of the frame so it wouldn't bend the thin ply in and that worked great. We manufacture tungsten alloys and it's extremely heavy compared to steel so that gave me enough weight to make the bend from back to front. There's a few pics in my album on here minus the bottom halves of how I used the weights - they seem to come in handy for builds, especially the blizzard X rigger I've got gluing right now !!! ;)

The initial setup is dry. So I move on to the next steps which include attaching the remaining 5 frames, keel, and stringers.

I had a little trouble getting the 4th frame in place. The directions said the framing should easily 'stretch' to allow it to slide in place, but I found it was much easier to pull one sheer up and pop it in on an angle.

132_3296.JPG


Once that dried it was time for the chines. I couldn't find a suitable place to use the clamps to hold the chines in place and I don't have any straight pins so I decided to try using twist ties. Here you can see how the clamp is pulling on the stringer. But it also shows how the ties were used.

133_3309.JPG


The keel battens were added before I went to bed and I haven't gotten pictures of that yet. They were pretty straight forward, with a little trimming the popped in place. Then I needed to do some trimming, made easy using the saw blade attachment I got with the rotary tool...I love that thing.

So the next step will be adding the bottoms. This is where I'll definately be needing a lot of sanding. Everything needs to match the frames as the bottoms need to sit flush on everything possible. I'm a little nervous and hesitant with this part. Any suggestions for things to watch out for here?
 
Looks like you're doing a great job! It's too bad that you don't have the 2 ltr soda bottle bottoms for your epoxy mixing "cups." They really come in handy for our small amounts of epoxy. Popsicle sticks work great for mixing. I've got a box of a thousand that I bought at Walmart several years ago. Will pretty much last forever :lol: . They're too big for a lot of our work so I cut them in half lengthwise and then I sand the ends to the perfect shape that works best for my building style. Just a thought that you might want to consider.

Before you glue the bottoms on, make sure that they will sit correctly on the crossmembers. Make sure that the crossmembers are sanded even so that the bottom pieces sit on them perfectly. You want the bottom to be straight and not have any bulges or dips. Trial fit those big pieces many times before you glue.

I'm not sure but will you have to remove your framework before you glue the bottoms on? Hopefully not. If you do have to, be extra, extra careful to not induce any twist into your framework as you're epoxying the bottom on ;) !
 
So what is the end use going to be? Dropping a .12 or something in it? If so, you might want to consider cutting out the bulkhead in front of the engine to make space for a fuel tank. I've had 2 of the 'glas versions and you'll find that you're going to run out of room quickly once you try to shoehorn anything larger than what the boat was originally built for.
 
Ok coming along quicker than expected :) .

So I've got the framing sanded even for the whole bottom. The bottom piece sits flush on all the contact points. And I've been trial fitting the bottom pieces for a couple days, and I'm a little confused. Once this step is done, I'll need to water and fuel proof the whole thing. What do you guys use for a sealer? Oh and should I be using the motormount from the kit, or do they come with the engine? The one in the kit is for a baby bee engine? Anyway, I assume it'll be different depending what engine I go with...man there's a lot of things to think about.

You see here I'm looking for the best fit. I would think it should cover as much of the batten as possible, with a little of the chine hanging out on one side forming a lip? Or do I have that backwards? Will I need to use a filler here to finish the hull? The bottom isn't centered here as I'm shifting it back and forth. Does that make sense?

133_3343_new.JPG


As far as the engine goes, I'm really unsure what I should go with, I'll need to decide soon. I really don't know anything about model engines, so a .10 or .12 really doesn't mean much to me. Are there any tutorials or knowledge base articles on engines? Would the hardware kit for a .10 be good enough for a .12, or would I need something stronger?
 
Last edited by a moderator:
These boats were originally made for little Cox TD .049's and .051's as more of a play boat. A cheap .12 engine will do in that boat if you are looking to save some money yet have fun with it.

I wouldn't use the Dumas hardware but some Octura parts would work nicely in it as either sub-surface or surface drive. A 4 oz. fuel tank would give you a lot of run time.

As far as sealing the boat, a slow setting epoxy will do the job. Just put it on then wipe off the excess with a paper towel. I learned that trick in here and yes, it does work very well.
 
you might want to start sealing the framing that will be difficult to reach now. Like Ron said, put it on and wipe it off. Don't leave a it gobbed on there or your boat will weigh a ton. some folks squigie it off with a playing card. make sure you don't miss a spot or the oil wil get into the wood and losen the glue joints.

Looking good so far!
 
On the bottom when i built one which was a 40 size the bottom does not over hang on the chine should be just touching the inside edge of it.That way it has the chine the same size of the original shape of it.You will have to fit the bottom sheet to make it fit.Start at the outer egde and then fit the middle .
 
I don't think that you want the bottom piece overhanging the chine either.

When you epoxy the bottom on, make sure that your clamping doesn't warp the bottom as you apply pressure to press the bottom sheet to the frame. You'll probably need a larger piece of scrap wood to spread the clamping load. You may even need to add some weight. I used a little bit of everything on my last build including canned food :lol: and 5 lb bags of sugar! It is a larger boat (48"!)

To use your epoxy for sealing, many people will thin it out with some type of solvent. I don't think that there is anything wrong with this for sealing as long as you don't add too much solvent. People will chime in and let you know what to use. I've used denatured alcohol and it worked pretty good. These days I use a special sealing epoxy that I picked up from Progressive Polymers Click here

called Low V. It is a thinned out, sealing epoxy and it works very, very well. I've got 3 wood boats all sitting about 90% complete with 2 more Dumas wood boats still in their boxes so I can use a decent amount of the stuff. For you, I'd just thin down your 30 min adhesive epoxy. Use an epoxy brush to brush the epoxy everywhere inside the hull. I even used a small dental mirror to make sure that I got the undersides of wood pieces such as the shears that you have nailed down to your building board. It can get difficult to completely coat the underside (the part facing up on your board where you have the word "shear" written) when you can't really see it. To save a little weight, you can do like others have said and wipe the excess off with a paper towel.

It will be hard to use a playing card or Bondo squeegee to squeege the excess out of the inner hull. When you seal the outer hull, it will be very, very easy! You'll see how far your epoxy mixture will go when you put that squeegee to use :eek: . You'll probably have to apply 2 coats to fill the big grain of that mahagony plywood if you squeegee
 
Last edited by a moderator:
Excellent! Thanks for the advice. I should have the bottoms on tonight. I'll also experiment with mixing the sealing epoxy while it dries. As always I'll post my progress as I go. Is it normal to be thinking about my next project already?
 
Back
Top